Sunday, August 23, 2009

It's Summer, So It Must Be Zucchini Time

This frittata is one of those dishes that's more than just the sum of its parts. It's a good way to use a generous amount of zucchini, it's a nice lower-fat vegetarian main dish, and is very tasty. The tomato side is optional but is a nice piquant contrast to the creamy greenness of the frittata, and rounds out the plate well.

The original recipe (from Eating Well) calls for fresh marjoram, but really you could use just about any herb or herb combination. The last time I made it I used a dried Italian herb blend, of course using only 1/3 of the amount of the fresh herb called for. To boost the heartiness of the dish and to provide some starch, I added a bit of cooked potato to the mix. I prefer to use grape, cherry, or plum tomatoes for the side; regular "slicing" tomatoes are too juicy and break down too much in the saute. Finally, since I was cooking for just me, I cut the recipe in half, using a medium well-seasoned iron skillet. If you use the non-stick skillet called for, be sure that it's one that is oven safe.


Zucchini-Ricotta Frittata with Warm Tomato Garnish
adapted from Eating Well

1 1/2 pounds zucchini, coarsely grated
1 1/8 tsp salt, divided
2 Tbsp olive oil, divided
4 large eggs
4 large egg whites
1/4 tsp freshly ground pepper
1/2 cup grated Parmesan or Monterrey Jack cheese
1 Tbsp chopped fresh marjoram (or other herbs)
1 cup cooked diced red or white boiling potato (optional)
2/3 cup part-skim ricotta cheese

for the garnish:
2 1/2 cup chopped tomato (preferably grape, cherry, or plum)
1 medium shallot, minced
1 small clove garlic, minced
2 tsp chopped fresh marjoram (or other herbs)
2 tsp extra-virgin olive oil
1 tsp balsamic vinegar
salt and pepper to taste
  1. Toss zucchini with 1 tsp salt in a medium bowl; put in colander to drain for 20-30 minutes. Rinse briefly and squeeze dry.
  2. Whisk eggs with pepper and remaining salt in a large bowl. Stir in cheese, herbs, and cooked potato (if using).
  3. Preheat broiler.
  4. Heat 1 Tbsp olive oil over in a large non-stick skillet over medium-high heat. Add zucchini and cook, stirring frequently, until water evaporates (5-6 min). Add to egg mixture, stirring to mix well.
  5. Wipe skillet clean and return to medium-high heat. Heat remaining 1 Tbsp oil in the skillet, then add egg mixture and reduce heat to medium-low. Dollop ricotta over the top.
  6. Cook until eggs are set on bottom but the top is still wet (5-7 min). Transfer skillet to broiler and broil until done (3-5 min).
For tomato garnish: Toss all ingredients together. Cook in a skillet for a couple of minutes, until warm and releasing juices.

Saturday, March 28, 2009

Pie: Epic Fail

With the frequency of my blog entries being so shamefully low, it might appear that I'm obsessed about pie, given that this will be the second entry of the last three about pie. I'm not obsessed, but I have had another memorable pie-centered event.

You see, March 14 was Pi Day. Get it? Pi begins with the numbers 3.14, so, 3/14 every year is Pi Day. Congress even made it official this year. So, the natural way to celebrate Pi Day is to eat some pie. Not only are the two words homonyms, but pies have the added advantage of being circular. Ha.

Pi Day was on a Saturday this year, but since I have a new range that needed a workout, I thought I'd make a pie to take to work on Friday. Since I work in IT, I knew that my coworkers would be all over Pi Day and wouldn't look at me with that "you're a nerd, aren't you?" look I've gotten at other jobs.

I decided to make a basic chocolate cream, assuming that that would have the broadest appeal and wouldn't require too much work on a weeknight. (Despite the original intention to give the oven a workout, I wound up with a type of pie that wasn't baked, except for a brief stint for the crumb crust.) Not having a stand-by recipe, I perused my usual sources and narrowed it down to two candidates: A recipe from Gourmet, and one in Ruth Levy Beranbaum's
The Pie and Pastry Bible.

For the filling, I chose Ruth's -- the two recipes were very similar, but Ruth's promised to be a little darker chocolate-wise, and called for whole eggs, which appealed to me more than the egg-yolk-only formula from Gourmet. If you are unfamiliar with Ruth's books, she's a food scientist at heart, and the recipes are calculated and tested to the nth degree, so I had no fear of making a recipe of hers to serve to others without a trial run. I did use the chocolate crumb crust from the Gourmet recipe since I wouldn't have time for the dough resting needed for a good pastry crust.

Naturally, my hubris got me.

The end result, while tasting fine, was not something I'd be proud to present. You see, both recipes call for mixing cornstarch with the egg/egg yolk at the beginning; milk is added later. This runs counter to every recipe and rule of thumb I know about cornstarch, which states you should always dissolve it in cold liquid before adding to the other ingredients. I trusted that Ruth (and Gourmet) new what they were doing, and that the cornstarch would dissolve and mix in well with the eggs.

It didn't.

Now, I freely admit that this could be as much user error as anything else; perhaps I didn't use a sufficient whisking technique. The fact remains, though, that the egg was just too viscous to readily absorb the cornstarch. I soldiered on, hoping the rest of the process, including the straining called for at the end, would redeem the mixture. To make a long story short, it didn't. The end result was the right consistency, and tasted good; it had a grainy texture rather than the dead-smooth texture you expect in a cream pie, though.

So, I did not take it to work -- it just wasn't up to my standards. I did enjoy a slice Friday night, just for testing purposes, mind you.

I will make another of these pies another day ... the difference is that I will be sure to mix the cornstarch with a little of the milk before mixing with the eggs!

Tuesday, January 13, 2009

Hot Drinks for Cold Nights

Now that winter is really here and making itself a true pest, it's time to ramp up your repertoire of hot beverages. Besides the usual coffee and tea (my favorites are Earl Grey and Lady Grey), don't forget hot chocolate.

If you want to make a real treat rather than just something sweet, do yourself a favor and dump the little packets. Make some hot chocolate from scratch -- it's easy and so much better than the mix. There are a million recipes, but I like this one from the Hershey's Dutch Processed Cocoa container.

Hot and Creamy Cocoa

2 servings

3 Tbsp sugar
2 Tbsp cocoa
1/4 cup water
1 3/4 milk
1/2 tsp vanilla extract

Combine sugar and cocoa in saucepan; stir in water. Cook and stir over medium heat until mixture boils; stir in milk and heat. DO NOT BOIL after milk is added. Remove from heat; add vanilla.

Of course this is just a base for all sorts of variations. Give it some Mexican flair by adding cinnamon, or a grown-up kick with Kahlua or some other complementary liqueur. But now for something completely different ...

Here's an unusual treat that I found on MyRecipes.com recently. The combination of white chocolate and ginger is inspired in a hot drink -- the spice of the ginger intensifies the warmth of the drink and gives it a depth beyond the sweet smoothness of the chocolate. This is a Cooking Light recipe so it does use skim milk; of course you could use whole or any other type of milk. Also, I have used a good-quality, fresh powdered ginger in place of the fresh in a pinch, but fresh really is wonderful.

Hot White Chocolate with Ginger

Cooking Light, Dec 2002
8 servings (serving size: 1 cup)

2/3 cup chopped peeled fresh ginger
1/2 cup sugar
1/4 cup water
8 cups fat-free milk
1 cup chopped premium white baking chocolate (about 4 ounces)

Combine first 3 ingredients in a large saucepan; cook over medium-high heat until sugar dissolves and mixture is golden (about 5 minutes), stirring frequently. Remove from heat; cool slightly.

Add milk and chocolate, stirring with a whisk. Heat over medium-low heat to 180° or until bubbles form around edge of pan, stirring frequently (do not boil). Strain mixture through a sieve into a bowl; discard solids.

Sunday, January 4, 2009

Baby don't you cry, gonna make a pie

If you've seen the film Waitress, you know that the title of this post is also the first two lines of a song the eponymous waitress sings as she ... makes the pies that she loves to make. Pie IS a glorious, fabulous thing, sometimes shunted aside in favor of its showier cousin Cake. A good pie is heaven-sent, though, and should never be taken for granted. I think we've gotten used to the excuse for pie we're often presented with: Frozen, commercially-prepared products that may satisfy a sweet tooth but which fail to live up to the wonder that is good pie.

I could spend an entire post on the home-made vs. store-bought crust issue; let's just say I've availed myself of both. When time and circumstances permit, though, home-made is definitely the way to go. Don't let Fear of Piecrust stand in your way, though -- if using that frozen pastry crust or packaged crumb crust gets you into the kitchen to make a pie, then by golly go right ahead. I won't look askance.

For the holidays recently I made four different pies (plus a cake). Thanksgiving was a mincemeat pie, because that is my mother's favorite for that holiday. The filling was packaged but the double crust was made from scratch. The other Thanksgiving pie was a two-layer pumpkin: A cheesecake-like layer topped by a fairly traditional pumpkin layer. The crust for that pie was also from scratch, using the same recipe as for the mincemeat. I'm told the mincemeat was good -- I didn't have any -- but I did love the pumpkin pie.

Pumpkin Cheesecake Pie - King Arthur Flour

The pie crust itself is a bit of a story. I didn't make the crust recipe that was part of the pumpkin pie recipe; instead, I made Rose Levy Beranbaum's recipe from The Pie and Pastry Bible. The recipe, while not more difficult than others, has more steps and takes more time. Still, I think the results are worth it and it's my standard recipe. I plan on making some others for the sake of comparison (for example, Cook's Illustrated's version that uses vodka instead of vinegar). The techniques and science behind Beranbaum's is sound, though, and no matter what recipe I use in the future I'll carry what I've learned from her with me.

Basic Flaky Pie Crust - Rose Levy Beranbaum
(NOTE: I use about half the amount of vinegar called for in the recipe, and sometimes omit the baking powder, esp. if I want the crust to hold a decorative shape.)

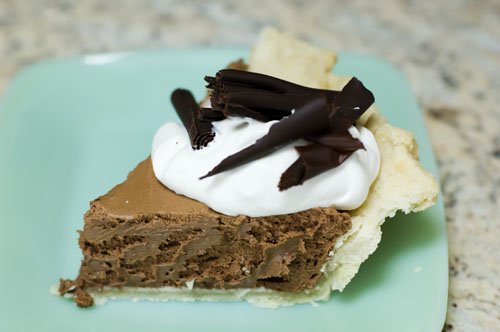
I made the second two pies for Christmas dinner. I was in the mood for some old-school, diner-type pies, and I thought these fit the bill. The first, a coconut cream, used Beranbaum's crust again. While my parents and I like coconut and are especially appreciative of a good coconut cream pie, my siblings are strongly anti-coconut. So, I knew that pie was going to have a limited audience. The second pie was destined to have broader appeal because it was chocolate -- a real old-fashioned French Silk pie.

French Silk has gone out of style -- indeed, it can be hard to find a recipe for it -- because it calls for raw eggs. We now have pasteurized raw eggs available, though. I have heard of people using Egg Beaters or the like as well, but I haven't tried that myself. A French Silk pie is beyond decadent, though, without being heavy like the leaden, almost bombastic death-by-chocolate sort of desserts that are so popular. Creamy and, well, silky, a French Silk is everything a pie should be.

Instead of a pastry crust, I used a crumb crust made with the Nabisco "Famous Chocolate Wafers." I also grated dark chocolate over the whipped cream rather than making the chocolate curls.

French Silk Chocolate Pie - Pioneer Woman blog

Coconut Cream Pie - Bon Appetit

Sunday, August 31, 2008

It's still ice cream weather

Last night I went out to dinner with some girlfriends for a birthday celebration, then we retreated to a member's house for make-your-own ice cream sundaes and a cupcake tasting. It was a very foodie day! I'll write another day about the restaurant and the cupcakes; today I wanted to post the recipes for the sauces I made for the sundaes.

The first is hot fudge -- a recipe that mother has made as far back as I can remember. I modify it a bit by adding more chocolate. The second, a butterscotch sauce, is a recipe that's new to me; I wasn't absolutely thrilled with the final result, but it was fine and my fellow sundae-makers seemed to enjoy it. Today I discovered that I misread the recipe and did not use nearly as much cream as the recipe called for. I'm sure it'll be better next time when I actually follow the recipe. :P

Ferrell Hot Fudge

1 can sweetened condensed milk (preferably NOT low-fat)*
3 ounces unsweetened chocolate, broken into several pieces
1/3 cup water
pinch of salt
1/2 tsp vanilla extract
1 to 2 Tbsp butter, cut into small pieces

Add water to the bottom portion of a double boiler and bring to a boil. Lower the heat to medium. Combine condensed milk, chocolate, water, and salt in the top portion of a double boiler. Simmer, stirring occasionally, until chocolate is melted. Continue to stir until all ingredients are thoroughly blended and the sauce is smooth and of a completely uniform color. Remove from heat and stir in vanilla and butter. Stir until butter is completely incorporated. Serve hot or warm over ice cream.

* Sweetened condensed milk is an area where the brand matters to me -- I always use Borden's Eagle Brand.

NOTES: If sauce is too thick, stir in additional water, a Tbsp at a time. Sauce can be refrigerated, covered, for several days. May be reheated in the double-boiler or the microwave -- heat gradually using medium heat and stirring frequently to avoid scorching.

---------------------------------------------

Butterscotch Sauce

Everyday Food

1 cup heavy cream
6 tablespoons butter
1/3 cup packed light-brown sugar
3 tablespoons light corn syrup

In a small saucepan, combine cream, butter, brown sugar, and corn syrup. Bring to a boil over high heat; cook, stirring occasionally, until sugar has dissolved, 2 to 3 minutes. Let cool to room temperature. Sauce can also be made up to 1 week ahead; cover and refrigerate in an airtight container.

TL's NOTES: This is a very thin sauce when hot. It is really best at room temperature. If you refrigerate it, bring to room temp before using.

Tuesday, August 26, 2008

What's Up in the Kitchen

Other than writing about my adventure at the Viking cooking school, I haven't written about food or cooking lately, obviously. I wasn't cooking very much the last few weeks, partially due to being busy with other things, and partially due to being glued to the TV for the Olympics. One of the things I've been busy with is finally -- finally! -- making some decor decisions and getting started on some house-fixing. The other is that I had a landscaping company come look at the disaster of a yard I have and talk about long-term plans for improvements.

The property has basically suffered from benign neglect for a number of years and needs some serious work to look "nice." That's going to be a multi-year project with a list of to-do items as long as both my arms. To start with, though, I wanted someone to come in and do some serious cut-back of some jungle-like growth of vines and brush along 3 of the 4 sides of the property, as well as trimming some trees, cleaning vines off the garage and house, etc. etc. The landscaper -- Eric Cook, Greenway of Nashville -- was nice and his crew did a good job. It put a serious dent in my pocketbook, but things look a lot more controlled. Eric had also suggested adding something attractive in addition to clearing stuff away, specifically some small holly and spirea on either side of the front steps. I had planned to eventually plant some things in those areas, so I told him to go ahead. It does look nice and spiffs up the front a bit. If I could find my camera (it's SOMEWHERE in the study, just exactly where is undetermined) I would post a picture. When the camera is located one day when I remember to look for it, I'll do so.

P.S. I remembered another factoid from the knife class ... brown and pink shrimp are always wild-caught. White and tiger shrimp can be either wild-caught or farmed. So there is your Culinary Fact of the Day.

Monday, August 25, 2008

Addenda!

Here are a few additional things I remembered today from yesterday's class.

  • When buying an onion, always sniff it. If an uncut onion actually smells of onion, don't buy it -- that means that the onion has been bruised or otherwise damaged.
  • The name of the dice created by cross-cutting the julienne is brunoise. Whew!