
My favorite white bread recipe was featured on the blog a few weeks ago. (Yeast Bread - Yes You Can!) I have another favorite recipe for yeast bread -- this one is whole wheat. Baking with whole wheat flour presents some special challenges. As noted in my previous post about wheat flours, a good wheat yeast bread made depends on gluten for structure. In general, the higher the protein content in the flour, the more potential for gluten development. When you are working with white flours -- flour where the germ and the bran of the wheat kernel has been removed -- this relationship is pretty straightforward. If you are working with whole wheat flour, however, a number of factors complicate matters. This recipe provides some techniques for getting the most out of a 100% whole wheat loaf.

Gluten is a substance that's formed when wheat flour is combined with water. The capacity for flour to form gluten is indicated, in part, by the protein content of the flour. (See Picking the Right Flour for the Job for more detailed information.) The water interacts with two types of protein in the flour -- gliadin and glutenin -- and stretchy bands of gluten form. That's fine for white flour, but wheat flour has a third type of protein that interferes with gluten formation. In addition, the sharp edges of the bran particles cut the strands of gluten that do form, reducing the potential for structure-building.

What if you can't find whole wheat bread flour and don't want to go to the expense of buying it online? In a later blog post I'll discuss making a loaf with whole wheat all-purpose flour. For now, though, let's look at my favorite recipe for a basic whole wheat loaf with the bread flour. This recipe comes from the book that taught me how bread-baking techniques for whole wheat must be substantially different from those used with white flour. "A Loaf for Learning" from The Laurel's Kitchen Bread Book
Note: If you are interested in even more information about working with whole wheat dough, I highly recommend the original recipe, which is a lengthy tutorial. What I'm offering here is my paraphrase of that detailed, informative lesson. Also note that the information and techniques here work well for white breads, as well -- you'd just do the first and third rises, not the middle one.
100% Whole Wheat Bread Loaf
Adapted from The Laurel's Kitchen Bread Bookmakes 1 standard loaf
1/3 cup warm water (110F to 115F, or temperature recommended on yeast container)
1 tsp active dry yeast
2 tsp + 1 Tbsp honey
3 cups whole wheat bread flour
1 tsp table salt
1/3 cup plain regular (not Greek style) yogurt
2/3 cup hot tap water
2 Tbsp neutral vegetable oil
Cooking spray or oil
Rinse a ramekin or small bowl with hot tap water to warm it up. Add the 1/3 cup warm water, the yeast, and 2 tsp of the honey and stir together. After 10 minutes or so the yeast should have activated from the warm water and started to feed on the honey; the top of the mixture should start to foam. While the yeast is waking up and having breakfast, mix together the flour and the salt in a large mixing bowl and set aside. In a 2-cup measuring cup or bowl, mix together the yogurt, the hot water, the vegetable oil, and the remaining 1 Tbsp honey; stir until the honey dissolves and the mixture is well combined.
Make a well in the center of the flour in the mixing bowl. Pour in the proofed yeast mixture and the yogurt mixture. Using a rubber spatula or wooden spoon, start to stir from the center and gradually work outward to incorporate more flour. As more flour gets worked into the dough, it will be harder to mix.
At this point in the process the dough should become well-mixed and somewhat sticky. One important factor with breadmaking is that different flours have different moisture content. It turns out that the flour I used here was very, very dry. In order to even get all the flour incorporated I had to add more warm water. I started with a couple of tablespoons, and probably wound up adding 1/3 cup before I felt it had enough moisture to go on.
When the dough is mixed as well as can be done in the bowl, lightly flour a very clean work surface and turn the dough out. Give it a few experimental kneading strokes to finish bringing it together and get a feel for the dough. At this point you want to let the dough rest a bit to let the flour finish absorbing whatever water it can absorb.
 |
| rested and ready to knead |
Knead the dough for about 10 minutes. Contrary to what you might assume, whole wheat doughs don't like rough treatment. Knead firmly and vigorously, but keep your strokes smooth and even. The dough is ready when it's smooth and springy. If you take it between both hands and stretch it a bit, it won't tear.
Rinse a large clean bowl with hot water to warm it. (The bowl should be more than double the volume of the dough.) Form the dough into a nice, tight, smooth ball and put it in the warmed bowl. (Note: This recipe advises NOT greasing the bowl as is called for in most yeast bread recipes. It's true, you don't need it, and the fat can cause holes in your crust.)
 |
| ready to rise! |

Use your wet fingers or a rubber spatula to loosen the dough from the sides of the bowl. Gently pull it away from the surface of the bowl, all the way around, and pull it up from the bottom. Try not to disturb the top too much; this is eventually going to be to the top of your loaf, and it's developing a nice, smooth, unbroken sheet. When the dough is loosened, gently tuck the edges under. Go around a few times, tucking and tucking again. What you are shooting for is to re-form a ball of dough from the current poofy blob. You're re-invigorating the yeast, but doing so gently and you're keeping that outer surface intact and re-tightening it.

Re-cover the bowl and return to the warm rising place. It should rise probably another 45 minutes to an hour, but check it in 30 minutes. Do the poke test again. When it reaches the same point where the poked hole does not fill in, you're ready for the next step.
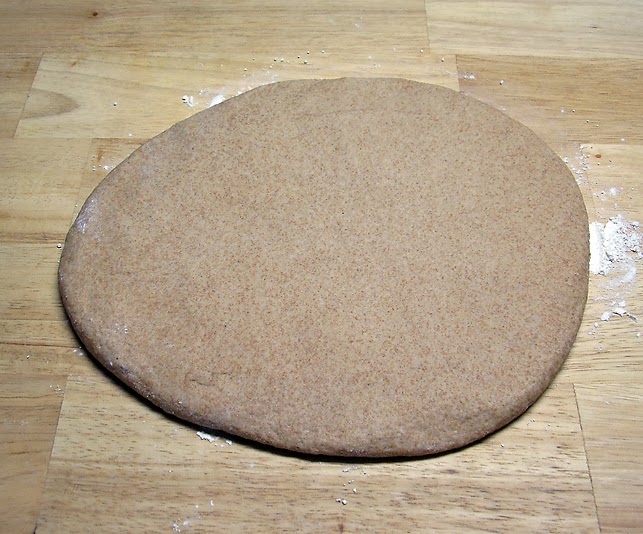
Lightly flour your clean work surface again. Using the same gentle pulling technique with wet hands, ease the dough out of the bowl so that it is top-side down. Gently press the dough out into a disk. You should notice lots of gas bubbles in the dough at this stage. You want to press these out as much as possible; they will result in holes in your finished bread. As you press on the dough from the center out, encourage the bubbles to pop. Think of it as food-based bubble wrap! It just won't make as satisfying a noise.
The next stage, called rounding, may be new to you, even if you are an experienced bread-baker. Pull one side of the dough disk over to fold the disk almost in half. Going around the disk, fold in the edges so that you end up with a smaller, thicker "package" of dough.

Turn the dough over. Using the outer edges of your hand, smooth the top from the center out to the sides to start to form a tight ball. Rotate the dough a bit and repeat the action. Turn and smooth, turn and smooth. Each time your hands pass to the underside of the ball, squeeze a bit. You almost make a little foot at the bottom of the ball. When the ball is smooth, tight, and cohesive, let it rest for about 10 minutes. In the meantime, prepare your pan. This bread works best in a medium-size loaf pan, 8 x 4 to 8-1/2 x 4-1/2 inches. Generously grease with cooking spray or oil.
 |
| well-rounded! |

Fold the sides in, one after the other, until the width of the dough is about the length of the loaf pan or a little less.

Press out the dough again, popping those bubbles. Starting at the top of the dough, roll it forward like rolling up a jelly roll. You may not get more than one good roll-over, but the object is to have a log of dough. Pinch the loose flap to the log of dough to make a seam. Lift the dough into the pan, seam side down, and tucking the ends under if it wound up being a little too wide.
 |
| Note that I still had some renegade gas bubbles |
The last stage of preparation is called proofing. Professional bakers often use a proofing box, but you can improvise a similar environment. It should be warm -- it can be even a little warmer than the first two risings. It also helps if it's a moist environment; this will prevent the crust from drying out. One way to do this is to spray the inside of a large plastic bag with a mist of water, put the loaf pan in the bag, and seal it. What I did was put some warm water in the bottom of a very large mixing bowl, rested the loaf pan in the bowl, and covered the whole thing with plastic wrap. (Note: The water did not touch the bottom of the pan.)

Put your proofing contraption in the warm rising place, and let it rise 30 to 45 minutes. You can do the poke test, but this time you don't want to wait until the hole doesn't fill in -- the dough still needs some energy to spring in the oven.

Usually I go ahead and turn on the oven to preheat (350F) within a few minutes of starting the final proof. Before putting it in the oven, though, I give the loaf a slash. Slashes aren't merely decorative, but can give the dough extra freedom to expand in the oven. Professional bakers often use razor blades for slashing. You can use a knife, but you want a thin, very sharp blade. One center slash, from end to end, works well.

Put the pan on the center rack and commence the baking. The loaf usually bakes for 45 minutes or so. Check it at the end of the 30 minutes. If the top of the crust is already getting very brown, reduce the oven temperature to 325F. (This is usually what I have to do.) Check it again in 15 minutes. I like using temperature as my guide to doneness. This loaf should be 200F to 205F. Turn the loaf out in your well-protected hand and thump the bottom. It should sound hollow. The bottom crust won't be as dark and crusty as the top, but it should be obviously done. Remove the loaf from the pan and cool on a rack before slicing with a serrated knife.

Critique: My slash wasn't everything it should have been. For one thing, my knife wasn't as sharp as it should have been, and I wound up with some jagged edges. Second, I didn't go edge to edge of the pan. I stopped short, and you can see very clearly in the baked loaf where the dough was constricted at the ends of the slash, puckering where it was restrained from springing up and out like it wanted to do. It would have risen more evenly end to end if I'd taken the slash all the way out to both edges of the pan.

All in all, though, it was a successful loaf. It made great sandwiches, and toast, and grilled cheese. A winner.

No comments:
Post a Comment